
There are a lot of maps to memorize and master in Valorant. Their map pool keeps on getting bigger each year too.
Knowing every map is essential because you don’t have the freedom to choose which map to play.
Luckily for new players, Valorant rotates their map pool for ranked mode.
You can put off learning other maps when they are off rotation. However, it is still good to learn every map in the game.
This map guide will briefly cover each map’s overview, so you can memorize and practice map-specific strategies to win more games.
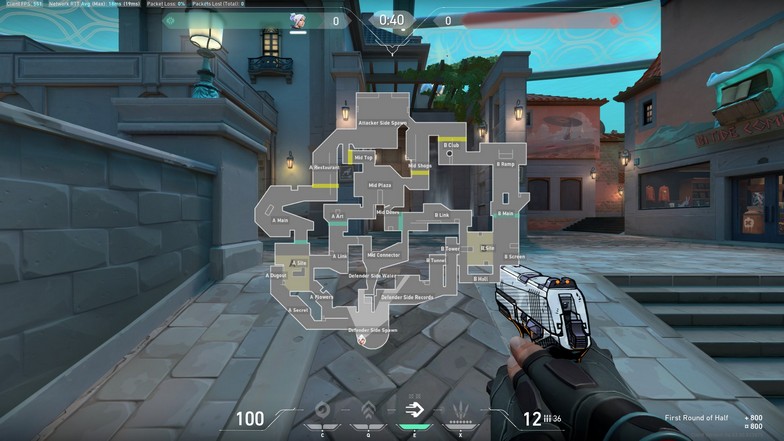
Ascent
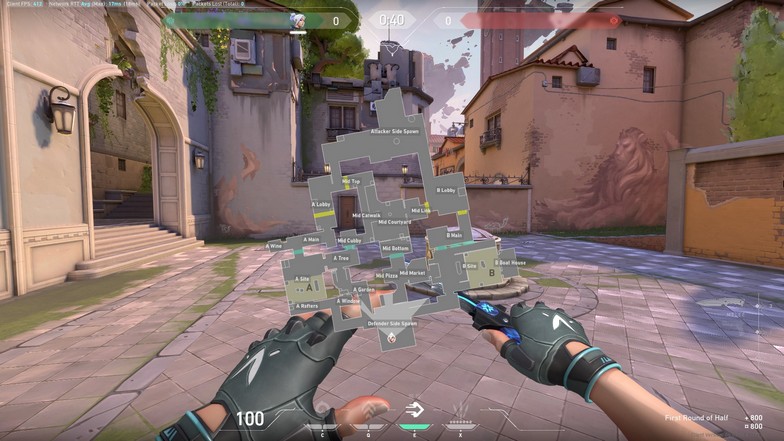
Ascent is one of the easiest map to learn in Valorant. It is also one of the first maps introduced in the game.
The map has two sites with a mid area. Each site is open from two angles, which makes mid-control crucial on the map.
If you give mid-control, attackers can do a two-pronged attack, which makes sites harder to defend.
As a defender, taking mid-control helps you gain more information.
If you are playing safe and defend from B Market instead of Mid Bottom, you can remove pressure from players anchoring sites.
Ascent has a switchable door on each site. Both doors are breakable when closed. These doors can close an entry point for the attackers from mid.
The sites are extremely hard to take as an attacker, but if defenders give it for free. Retaking is the site is just as hard.
A Site has two floors and a lot of objects to hide from. Boxes, generators, rafters, hell, and A Tree gives defenders multiple angles to defend.
B Site is extremely close-quarters when players start fighting in the site. The walls are also paper-thin, which makes wallbangs an option.
Bind
Bind is a unique map with two sites. It is unique because there isn’t a ‘mid area’ on the map.
Each site has two entrances. A Site has A Short and A Bath. B Site has B Hookah and B Garden.
There is a teleporter in the middle of A Short going to B Hookah, which could be the ‘mid area.’
However, if someone uses the teleporter, it makes a loud sound where everyone can hear.
In some scenarios, you can use the teleporter to rotate faster even if they hear you. You can also fake the teleport and go back to A.
The other teleporter is near B Main and B Garden. It teleports you near A Bath, which is a fast rotate from B to A.
These teleporters adds a big role to the game because of the interactions you can do to it.
You can throw abilities through the teleporters, which makes it a dangerous territory. Crossing to B Hookah is dangerous for attackers if a defender holds B Hookah and receives support from the A Short teleporter.
KA/YO or Skye can throw flashes through the teleporter and flash for their teammates peeking B Hookah.
Since there is no mid-control, it is harder to defend sites. Defender rotations will be more predictable.
For site retakes, you want to go from two angles, which entices defender to take space from the attacker side.
Sentinel traps are almost mandatory on the map to cover flanks.
Breeze

Breeze might be the biggest map in the game with two sites. There are a lot of open areas, but entrances to areas are a bit narrow.
For example, Breeze has a wide open mid area, but when you try to push through B Site or A Site, you’ll get clumped up in the middle door or the tunnels.
It is extremely hard to play for space in Breeze. The coverage is too much for players, which makes agents like Cypher effective.
His camera covering a wide area of the map helps gather information.
The map also benefits Operator users as they can control a big space with their weapons. It forces enemies to play safer instead of peeking.
Attackers don’t usually go for an Operator, but in Breeze, it is becomes a great tool for taking space.
Breeze is so big that the A Site is usually attacked through three fronts – A Hall, Mid Door, and A Cave.
B Site is much harder to push because of the narrow chokepoint and having one less front to attack.
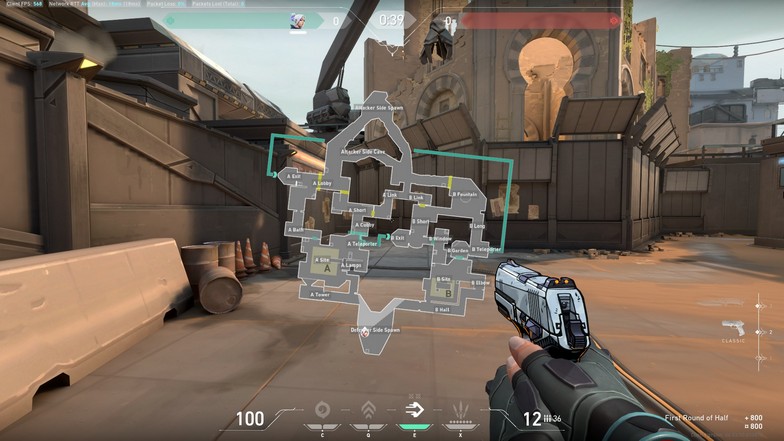
Fracture

Fracture is another unique map, mostly due to its layout. Defenders spawn in the middle of the map defending two sites. Attackers can sandwich the enemies from two fronts in both sites.
There is a rope in the middle where attackers can use to go from one side to another.
Both sites have two entrances, and it is extremely easy to rotate from one site to the other.
For attackers, they can hear the defenders movements if they don’t walk. They can catch defenders rotating early and adjust.
The same goes for defenders too.
Fracture is also unique because there are four ultimate orbs. You can grab one from A Dish, A Main, B Tree, and B Arcade.
Attackers even secure these orbs to spam ultimate abilities. Killjoy’s Lockdown stands out the most as it can cover the whole B Site from the underground tunnel.
Sometimes, these ultimate orbs forces fights because defenders don’t want the attackers to secure them for free.
Defenders can also take orbs for themselves. You would want someone to come with you to secure it properly or trade you when there is an enemy.
Haven
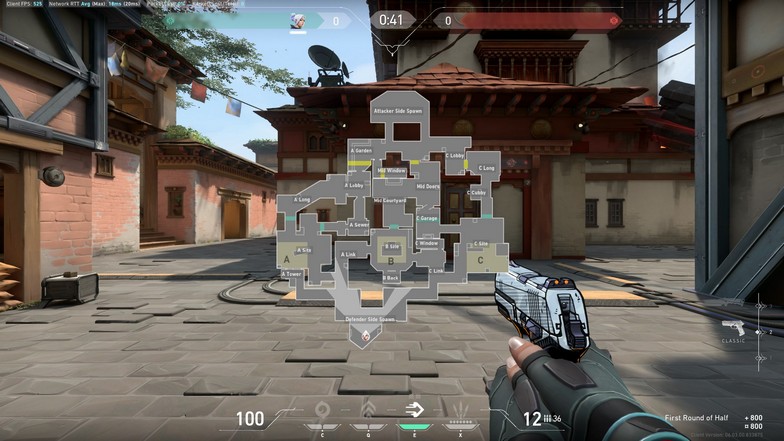
Haven is Valorant’s first 3-site map. Maps with three sites are usually considered attacking-sided maps.
It spreads out the defenders more while giving attackers more options to execute. Attackers can also easily get more space.
For Haven, you would often see pros take aggressive spaces as defenders.
For example, A Lobby is sometimes contested instead of defending A Sewer and A Main. Defenders need to use their abilities to take control of A Lobby.
Without a perfectly-timed utility, defenders have a disadvantage peeking A Lobby from A Main or A Sewer.
You want to use some abilities to take control of A Lobby. It forces the attackers to use their own abilities to take control of it again.
If the attackers don’t even bother taking A Lobby, defenders focus more on B and C, which is easier to defend.
Haven is a map with a lot of long and narrow pathways. A Main, A Sewer, and C Main. This makes Operators on the defending side more powerful.
However, apart from the three areas mentioned, everything else would be close range.
The angles are extremely tight once you enter A Site, B Site, C Site, and B Garage. It is almost impossible to clear all the angles without using utilities.
Using a double-initiator composition is highly recommended in Haven. Breach, Sova, Fade, and Sova are all strong agents.
Breach might be the best initiators here because every single ability he has is perfect for Haven. He needs another initiator for info-gathering.
Icebox

Icebox is a simple two-site map. The biggest design that makes Icebox unique is probably the long rope on A Site.
A Site has two levels – ground and second floor. Since there are a lot of ‘reachable’ elevation spots, you can say that the area has two floors.
Defenders and attackers can stand on top of A Pipes, A Nest, A Site Nest, A Rafters, A Belt, and A Screen.
There are other boxes you can stand on too. There are a lot of unique callouts specific to Icebox, which aren’t seen on the minimap.
That is how complicated Icebox’s A Site is.
Defenders try to defend A Site deep into their own territory. If attackers try to take the site, defenders will give it away for a retake.
However, their goal is try to get a pick off before backing away.
Planting the spike is one of the hardest things to do in Icebox. There are just too many angles to check for both A and B sites.
This puts Sage as a great agent to pick for every Icebox game.
Sage can use her wall to plant the spike safely. She can even wall A Nest and plant there because defenders can still spam through the normal wall.
Lotus
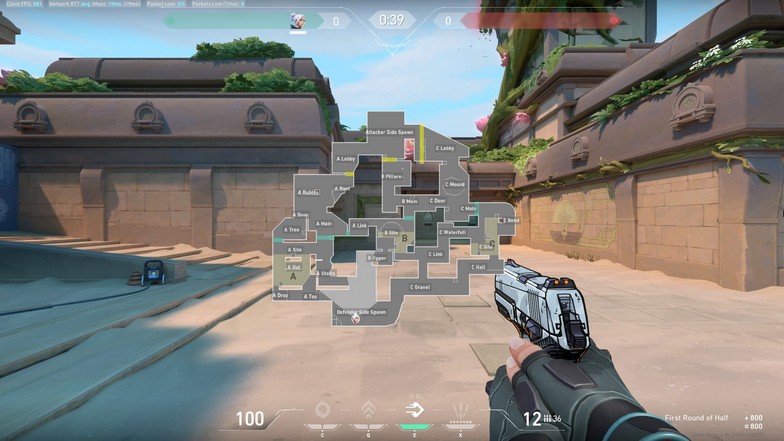
Lotus is another map with three sites. It already makes the map attacker-sided with how wide the layout is.
The map features some switchable revolving doors in A Tree and C Main.
The doors aren’t breakable, but they make a loud noise when activated.
These doors rotate slowly, opening up a shortcut for either attackers or defenders to rotate.
A Link also has a breakable wall that allows another shortcut from A to B or vice versa.
This wall from A Link benefits the defenders more because it makes A Main much more dangerous to cross.
Attackers might need to use utilities on the wall to cross A Main. When the defenders don’t have enough players to cover a lot of angles, it can benefit the attackers more because they can easily rotate.
The C Site in Lotus is extremely hard to defend. If you watch some of the VCT 2023 games, you’ll notice they only put one defender in C Site.
They only put one defender there to gain information. That defender tries to pick one off if they choose to attack C Site.
The priority is trying to get one off and successfully retreat for a retake.
Retake is a bit easier in C Site because of how small the area is. Ultimates from Killjoy, Breach, or Fade can secure the site instantly or force the attackers to fight at a disadvantage.
A Site is the hardest site to defend. You’ll need two players anchoring the site while having one players in B Site closely pressuring A Main too.
The map is extremely close-quarters except for duels in A Main. As a defender, you don’t want to risk peeking A Main because attackers have the advantage there.
Pearl
Pearl is pretty much the most basic map. There are two sites with that are a bit far apart compared to other maps.
The mid area is a small square that can pass through A Art or B Link. The mid pathways to the site are quite long, so defenders don’t benefit much from controlling Mid Plaza.
B Site is one of the most open sites in Valorant. It is hard to plant the spike because of how open the area is to enemies.
Once you get the spike planted, it gets even harder to retake as a defender.
This is only true if the attackers plant the spike in the open. As long as the spike is open B Ramp and B Main, it will be hard to defuse the spike.
Attackers can play time in B Main and B Ramp because the defenders will take a long time trying to push it.
Pearl is also one of the few maps Harbor can play solo controller. Since Harbor cannot smoke sites from far away, the layout of Pearl’s sites are almost designed for Harbor to shine.
While most maps prefer an attacking strategy of attacking a site from two fronts, attacking B Site from B Main is doable.
The second front, B Link, cannot stop the plant because it is deep into the defender’s territory.
With a well-placed smoke or wall, you can cover B Tower, B Tunnel, and B Link. You just have to clear B Hall and the outer area of B Site.
Split

Split is one of the most one-sided maps in Valorant. It is defender-sided because of how far the sites are and how difficult it is to take.
B Site has a small chokepoint in B Garage, and once you come out of it, you are open from various angles.
Even as you push the site, defenders can anchor from behind the big pillar in the middle as they can get supported by teammates in B Tower.
Mid is even harder to push because the area is too narrow, and you’ll be open to two opposite defender angles (Mid Vent and Mid Mail).
When it comes to the A Site, you’ll also be open to a lot of angles, because A Site is wide open. However, you can also take A Ramps and A Tower to help your A push.
The site is hard to push with an Operator on the defender side. You’ll need extremely coordinated pushes along with synchronized ability usage.
The margin for error is bigger on the defending side because you can lose control of a site instantly. There is a lot of pressure to defenders anchoring the site, because once they are gone, it is hard to get pick-offs post-plant.


